Followers

Sunday 26 April 2020

Photo Clock Frame

 I was asked if I could make a photo clock frame of course I took it upon to make it I have done smaller clock frames but this is a big one. The frame was from Ikea which was handed to me and photos were sent to me to use for the clock.  I thought this Quote Time spent with FAMILY is worth every second was just perfect as it was for a special Wedding Anniversary. I got the quote in vinyl which was cut on 2 A4 vinyl sheets and sized up which was easy to do added to inside of the frame and where the clcok was going the arms were sitting in the middle of the "M".
 Due to being a Ruby Anniversary I added the photo in the way I was asked to put them and mat and layered onto Ruby colour card. I re-arranged them to the way you see in the photo onto the border frame which I finished it off with silver trim going round the main part of the frame and added clear gems at the bottom of the frame.
Here is the finished frame and really happy with how it's turned out. I think this is a really great to have as a keepsake and a working clock at the same time.

Thank you for taking the time to read this. 

Sunday 12 April 2020

2nd Memory Book Purple & Lilac

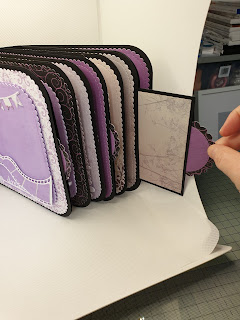
 Here is my Front of this memory book. I used papers from a 12x12 from B&M . The Life's Journey Keepsake Base Creator Die Set I used to make this memory book. I cut out 21 from my Crafters companion number dies. Cut out Niece and layering base for it.I double cut the butterfly layered and finished it off by adding Nuvo crystal drops.
 Page 1. I cut out The big book of me and its layering part to and glued them together, I added a double label at bottom of the page.
Page 2. I cut out the film strip twice in 2 different colours and layered them and added them to the page, The Banner die was already in my die stash. I also cut out the arrow twice just to give it some lift and added to page with my Arrow dream die cut also.
 Page 3. this one was just a basic page so things could be added to the page and doubled up layer of tag too. 
Page 4. I cut out the die Celebrate and put it together to look like a photo folder. and added Lilac pearl gems.

  Page 5. Happy Birthday Die from my stash and cut a circle same size to layer it up. Imagine was die cut with its layering base and added to the page.
Page 6.I cut out Just to say and flowers added to page and finished of with pearls on the flowers.
 Page 7. I made a flip part so you can added photos to it or anything you like. Added Butterflies and hearts to the page.
Page 8. I cut out a bow and its ribbon part from my dies stash. I double cut the arrow and added to page.
 Page 9. I cut out another Banner from my die stash also never stop dreaming and its layering part too and added to the page.
Page 10. I added 3 pearls and cut out a label and layered it onto page
 Page 11.I added another film strip cut it twice and layered it and added 3 pearls to the page.
Page 12. Cut and layered a label and double cut the arrow to give it some height on the page.
 Page 13. Added on this day photo folder, I cut out hello arrow and Butterfly and added to page.
Page 14. Cut out another Banner and flowers and added pearls.

 I also made big tags to add what ever you wanted and made pockets on the pages for them to go in as you can see from the photos. Pocket no3 
 Pocket no. 2
Pocket no.1  

Tonic Studios The Life's Journey Keepsake Base Creator Die Set and Dimensions die set keepsake book maker photos & filmstrip
Crafters Companion For Number Dies, Butterflies,hearts, circles and scalloped circles
B&M for 12x12 papers Purple and lilac 
All other dies used for this Memory book were in my die stash.

Saturday 11 April 2020

Cupid Couriers Special Valentine


With Valentine's Day well out the way, I completely forgot to share this with you all. I wanted something different for my hubby for Valentine's Day so this was the perfect time to make my 1st Memory book which I got the die set from Tonic Studios. I used a few photos for this and quotes and sayings from my sil Library (silhouette cameo library). rest were dies that I already had.

 Front of main memory book thought this layout went really well. The star frame, Husband, hearts and the circle for the layering Delivery were already in my die stash!
Page 1, it has got film strips that I had in my sil Library cut them 3 times and layered them. The middle one says I LOVE YOU using the heart in the middle. the open flap has my secret message to him.
Page 2,  I used a photo of us in our younger days and layered it onto black card. I'm now getting more grey and hubby is bald lol..I cut out Love using silver mirror card on my Cameo 3 and layered onto white card.
 Page 3,  Babes was cut out with a alphabet die set I had. I printed off another photo of us layered onto black card, Balloon was cut on my cameo 3.
Page 4, another photo this time just hubby doing funny face using Snap chat and layered onto black card. the circles under the photo was a die I used. balloon cut on cameo 3 and Too cool got kisses was printed using my sil software and cut and layered onto black card.
 Page 5, I made a pocket for this page for a topper to slide into it and another to sit on top. the swirly thing I cut using my cameo 3.
Page 6, made another pocket as you can see from the photo this time it's going side ways.with hearts surrounding it and a quote layered onto the a tag and edged the sides a bit. Hearts were cut using my Gemini machine with Gemini heart die set.
 Page 7, photo of us our first abroad holiday away layered onto black card.and a swirly heart sitting under it 
Page 8, this was a basic page but it was you got the key to my heart cut out from my dies I already had and put onto a tag.
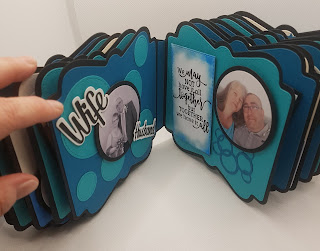
 Page 9, I put circles of different sizes as base and photo from our Wedding day and layered onto black card. Wife and Husband was cut out of black card and layered onto white card.
Page 10, another photo of us layered onto black card the circles underneath was from a die in my stash. quote was from my sil store and cut out and inked edge 
 Page 11, balloon cut on my cameo 3. Love always was also got on cameo 3 it had a base to cut too so I cut the base out on white card and the love always cut on the scraps I had of the card that I used for the main pages in the book. Hearts we die cut.
Page 12, photo of hubby on his own and white circle die cut sitting under it and the Topper" U R the love of my life" cut out using cameo 3 in black card  and layered onto white then black card. 
 Page 13, Made a pocket going down the side cut out Babes using my dies in my stash. Used a photo of us that pulls out.
PAGE 14, Another pocket page with another photo of us and layered onto black card, Love and and was cut out using my dies. You and me printed off using sil software cut and layered onto black card.
 Page 15,  Superhero cut out using my cameo 3, Crazy in love printed using sil software cut and layered onto black card.
PAGE 16, Another photo of us cut and layered onto black card, I cut circles using my gemini dies on my Gemini cutting machine. I love you quote printed using sil software and cut and layered onto black card.
 Page 17, Here's another pocket that the tag can be pulled out from and I am yours you are mine printed on sil software cut and layered onto black card. the quote on the tag is a marriage quote that was in my library on my sil software.
Page 18, Love was cut out using my die in my stash the love hearts cut out from a Gemini die on my Gemini cutting machine. The envelope was cut on my cameo 3 and is filled with love tiny toppers.
 Page 19, Photo of just my hubby cut and layered onto black card, The circle tag was cut out using my cameo 3 and layered onto white card,
Page 20, Pocket again and the word Laugh cut out from my Alphabet die set  and pocket was filled of 2 photos of my Hubby doing silly things cut and layered onto black card.
Page 21, Has side pocket with the quote printed, cut and layered onto black card that slides into the pocket. Photo of us both cut and layered onto black card. Husband and wife with their layers cut in black and white card,
Page 22, T he last page of memory book is photo of Hubby framed using a star frame die thats in my stash. and finished of with love cut out from a die. I cut it out twice and stuck them together and placed on top of the photo frame.
I enjoyed making this for my Hubby and it is certainly something different than I usually give him.


Tonic Studios Memory Book Maker Base Creator die set 2118e
Crafters Companion  Circle die set and Hearts die 
Silhouette Design store  Quotes and word cuts 
  Create & Craft Precision card stock and Lynda's Chapman's
 world of paper black card 


Tuesday 7 April 2020

Easter Count Down Sign Silhouette Cameo

In your software open your file in the design space. The first one is the Arrow. Increase the size do it here so all your pieces going to fit.
Now to open your 2nd file which is the Easter eggs circle frame. Open up a new tab and add design. Now copy the design and paste it to the design space which is your 1st tab where arrow is. Place the egg circle in the arrow decrease the size of it so it fits inside of the arrow. Once satisfied with the size move it away from the arrow. I put mine beside the page. Now to open another tab this is for the Floral Easter Bunny do the same as the Easter circle frame so it fits inside the arrow. I added the font Pinky cream for the “Easter Count Down” I did offset on it then make sure you highlight both of them and copy then paste to the arrow and decrease the size to fit it comes comes in 3 parts so you can play about with it. 


 Cut each of your files one by one. By going to the send screen. Where you’ll find loads of options to cut. Click on the type of blade your using as you can see with my photos I use rachet blade. For the type of card used, click on material drop down list and click on card stock plain. The rest of the settings will automatically change. For the chipboard and chalkboard vinyl do the same with drop down material settings and find them in the list and cut them out.


As you can see in my photo I cut out 2 of everything except for the font just one of each and the Easter egg circle frame as I cut 2 with card and 3rd cut was for Chalkboard vinyl. I used wet glue to glue the 2 chipboard Arrows together and while that drying which doesn’t take long I glued the 2 Easter eggs circle frame together  and the Floral Easter Bunny together and glued the Font onto the backing layer and finally glued the card onto the Arrow then it’s time to add all the parts onto the Arrow 


As you can see from the photo. I’ve made the yellow(sunflower) to be on the top. The parts that came out of the egg from the cutting of the cricket (Green colour)  I used them put in the eggs as photo shows and the remaining of the blackboard vinyl also to fill the eggs up. And the main part of the circle frame I used the cut out of the blackboard vinyl part to put in the centre of the egg circle frame. I used a spare dot from the blackboard vinyl to put on the Bunny acting as his eye and finally added string to the back of the sign.
Here is my complete finished Easter Count down sign with my Grandson modeling it off.

This Easter sign was easy to do even using 3 different files I absolutely loved making this. I will be using this again for more Easters to come and could adapt the sign and bring more or less into it. This is a relaxing project to do at anytime and this would be great fun time for children to join in and help you with it.

Materials used are
Silhouette Chalkboard Vinyl
Silhouette Chipboard
Precision card stock 
colours are Cascade, Cricket and Sunflower 
Wet Glue


Products Used
Design Store Design Used

Thursday 12 March 2020

Purple Louise (part one)

 It was coming up to Louise's 21st so it had to be special. I painted a wine (empty) bottle white and I cut"eat sleep sparkle repeat" on my cameo 3 using purple glitter vinyl.and added silver trim around the neck of bottle and lastly added led lights.
 Here in this photo it shows you with the lights on .
 I glittered the wine glass purple glitter gave it a couple of coats of it and sealed it. I cut louise 21 also in purple glitter vinyl and silver Trim.
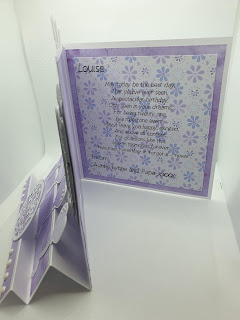
 This is the inside of Louise's card 
I made this as a 8x8" card and added extra part on for the front of card and measured 2" twice then 4" twice then an inch to add to the card with red liner tape. Yes got to be purple card to go with the other gifts. I cut Louise and the balloons  on my cameo 3. The Happy Birthday topper, number 21 and the die shapes behind the 21 done in my Gemini cutting machine. I layered Louise and balloons onto white card so the purple would stand out better. I layered the Happy Birthday to. As you can see were I added all the parts, I think it looks really good with the colours all standing out and finished the card with Nuvo drops.

Purple backing paper was printed from my files on my laptop.
Number 21 was from Crafters Companion
The die cuts behind the "21" are from Tonic Studios They are part of Memory Book die set.
Nuvo drops are from Tonic Studios
8x8" cards I buy from Craft Stash 


Wednesday 11 March 2020

50TH BIRTHDAY CARD

I was asked to make a special card,this is what I came up with. For this card I used my Gemini cutting machine to do the die-cutting. I used Tonic Memory Book Dream Big Keepsake wallet creator die set. I used the decoration part of it, cut the backing out of white card and top part in black card, I printed of the Happy Birthday Michelle die-cut using Crafters Companion oval die sets. The butterfly was cut out twice white underneath and black on top. The 50th was cut to white was cut under it and black on top. Sorry I can't remember who the die's belong to.I finished the card of by using white drops from Tonic Nuvo around the oval and on the Butterfly.


 Card I used was Precision Card stock

Monday 16 September 2019

Christmas cards started

 Merry Christmas to you. I used CA (craft artist pro 2) for these cards I've made. My png files already had I just put together printed off on Ice Matt photo paper 150gsm, matt and layered onto white card and cut snowflakes which my die was in my stash sorry can't remember who it from.
 I liked how this card turned out every image is in my stash png folder.  Printed onto Ice matt photo paper 150gsm and matt and layered onto gold card and says Merry Christmas to you Uncle.
 Another card I'm happy with this one too at first I wasn't sure but grew on me. I printed onto Ice matt photo paper 150gsm distress the edges on main card the blue backing paper. I already had the png images and put them together and card says Merry Christmas Gran and Granda.
This cute card I made for Boys Cousin for Christmas I just love that image...I printed onto Ice photo paper 150gsm. I matt and layered the images onto red card and put on it Merry Christmas Cousin. I'm making sure family cards are made first before I get requests in to make cards as I always get last minute requests.